Many faucet problems stem from sediment and mineral buildup, which can corrode the valve seat. In cartridge-type faucets, loose or damaged O-rings and a worn inlet or outlet seal can also cause leaks.
First, shut off the water. Next, remove the decorative cap from each handle using a flathead screwdriver. Once the screw is removed, place the parts in order they were removed so you can easily reassemble them. For professional help, contact Local Law 152.
Leaks are often the result of a damaged component. Rubber washers, o-rings, and gaskets are inexpensive and relatively simple to replace. Cartridges and valve seats may require a bit more effort, but they are also affordable options for restoring a faucet. Disc cartridges are harder to diagnose and replace, but once you’ve removed the old one you can often take it with you to the home improvement store for a replacement.
Faucets are subject to many different kinds of damage over time. This is mostly due to wear and tear, but sometimes the cause is more dramatic. Unusually high or low water pressure can cause the internal parts of a faucet to wear out faster than normal, causing leaks and other problems. A faucet can also be damaged by misuse or abuse, including rough handling, over-tightening of handles, and water pressure too high for the fixture.
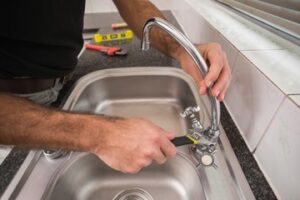
The best way to address these problems is to start by making sure the shutoff valves beneath the sink are fully open. Then remove the handle using a screwdriver and examine the interior components for signs of wear and tear or damage. Once the handle is removed you should be able to see a cam-nut or adjustable ring (also known as a ring cap) underneath the faucet that holds the stem or cartridge in place. If the nut is loose or missing altogether, tighten it with needle-nosed pliers. If there’s a problem with the cartridge or stem, unscrew the cam-nut or adjuster ring and unscrew the plastic cam and packer to remove the cartridge and see what needs to be replaced.
If you’re replacing a cartridge, take the old one with you to the hardware store to ensure you get the right replacement. It’s also a good idea to replace the O-ring that is usually found under the cartridge, since it can easily wear out too. Make sure you coat the new O-ring with plumbers grease to prevent it from leaking or burning up on contact with hot water.
If a new seal doesn’t fix the leak, you can try tightening the valve seat with a wrench or o-ring spanner to see if that fixes it. If the faucet is corroded beyond repair or you’re looking to upgrade its features, consider replacing it entirely. A new faucet that’s more efficient will save you money and will last longer than the original, even with constant use.
Leaks
The first step in faucet repair is to locate the leak. Look for water leaking from around the base of the handle or where the handles connect to the stem. In some cases, a loose screw or worn O-ring may be the cause of the leak. Simply tightening the screw or replacing the O-ring should stop the leaking.
Another common cause of leaking is a dirty valve seat. Over time, minerals in the tap water build up and deposit on the valve seat, causing a leak. Pouring white vinegar over the valve seat and then scrubbing it should help clean it. If a DIYer is unable to fix the problem, it’s best to call in a plumber.
If the faucet leaks at certain times of day or when specific tasks are undertaken, it could be due to changes in water pressure. In this case, the excess pressure is preventing water from flowing away properly and it backs up into faucets and other parts of the house. An experienced plumber can test the water pressure and determine if it’s too high.
Once a homeowner has replaced the damaged parts and cleaned the rest of the sink, they’re ready to reassemble their faucet. It’s important that the replacement parts are an exact match to prevent a new leak from occurring in the future. The order of assembly is washer/O-ring, stem, packing nut, screw and handle. Once reassembled, it’s essential to turn the water supply back on and check for any additional leaks.
When a dripping faucet can send up to three gallons of water down the drain every day, it’s not something that should be ignored. If a DIYer is unable or unwilling to solve the issue, it’s best to call in seasoned professional plumber to do so. The Frontdoor app makes finding the right Pro fast and easy, with real-time chat for advice on home repairs or maintenance and a list of vetted local experts who can make the fixes. Get started with a free quote. Just download the app, snap a picture of your faucet and enter some basic information to receive custom estimates from nearby Pros.
Cartridge Replacement
One of the most common problems in cartridge faucets is worn-out cartridges and O-rings. These parts can become corroded or coated with hard water mineral deposits, which can lead to leaking and difficult turning of the handle(s). Replacing these parts usually fixes these issues. To replace a cartridge, first shut off the water to the faucet by turning the valve(s) clockwise. Then, remove the handle(s). This might require the use of a hex wrench, which may be included in a faucet repair kit. Once the handle is removed, you can see and reach the cartridge retaining nut. If you do not have a hex wrench, use channel-type pliers to turn the retaining nut counterclockwise until it is loose and removed. After removing the retaining nut, carefully pull the cartridge straight up to remove it from the faucet body.
Some faucets have a clip that holds the cartridge in place. If yours does, use a flat-blade screwdriver to pry the clip away from its retention slot. This will reveal two plastic tabs on the cartridge that must be precisely aligned with the corresponding notches or slots in the new cartridge to ensure a tight fit. The white plastic tool that comes with most faucet kits has a square top that will fit neatly over the cartridge stem to help you grasp it and pull it out.
Once you’ve loosened the cartridge and removed it, take the new replacement and install it in the faucet by slipping it into its slot(s). Make sure the notches in the cartridge match the corresponding notches on the sleeve. If the sleeve does not fit tightly, it will leak. If you installed the cartridge correctly, it should click into place and be snug.
Once the new cartridge is in, put the retaining nut back on and reattach the handle(s). Replace the decorative collar (if present) and screw the handle(s) on. Open the water valve(s) and test the faucet for proper operation. If any other parts need replacing, do so now. They don’t make faucets like they used to, but replacement parts are available for most brands and styles at hardware stores, home centers and plumbing supply centers. If you’re unsure what type of faucet you have, it is best to shut off the water and disassemble the fixture before buying replacement parts. This will assure a perfect fit and help you avoid expensive mistakes.
Handle Replacement
Replacing the faucet handle is an inexpensive, straightforward way to update the look of a bathroom. It also can be a troubleshooting step when a cartridge has been replaced and the handle is still leaking or difficult to turn.
Before attempting to replace the handle, turn off the water supply valves beneath the sink. Look under the sink for these valves, which typically are located on either side of the faucet cartridge, and close them by turning the knobs clockwise to shut off the water flow. This will help prevent scalding injuries and ensure that any work you do will not affect the water in your home.
Shut off the water supply at the house shutoff valves, too, if your faucet is a single-handle model that doesn’t have separate shut-offs for each hot and cold. Whether you’re working on a double- or single-handled faucet, it’s essential to shut off the water so that you don’t accidentally damage any components while trying to fix the leaky one.
Examine the faucet handle to determine how it is secured to the cartridge and faucet baseplate. Many lever handles have a set screw under the curve of the handle; others have a decorative cap on the top of the handle that you must remove to access the handle setscrew. Use a flathead or Phillips-head screwdriver to remove the cap and reveal the handle setscrew underneath.
Once you’ve removed the handle, pry off the cover plate and unscrew the retaining screw at the base of the handle with an Allen wrench. You may want to label the retaining screw with a small piece of tape, such as “cartridge” or “handle,” so that you don’t lose it while installing the new handle.
Remove the handle securing screw and the handle from the faucet, then slip the replacement onto the handle and secure it with the retaining screw. Replace the handle cover plate and screw the handle back into place, ensuring that it snaps into place.
Replace the cartridge, if necessary. Make sure the new cartridge is the same type as the old one, and that it fits the cartridge holder’s hole. You may have to loosen the nut on the end of the stem in order to insert the new one, so have a set of needle-nose pliers handy to keep from scratching the spout and valve assembly with the tip of your pliers.