Plumbing Services

Plumbers Are On Call 24 Hours a Day, 7 Days a Week

Plumbers Dunwoody are on call 24/7 to fix the pipes that carry water and waste. Their duties range from repairing leaky faucets to re-piping an entire house. They are known for their manual dexterity and physical strength.

They also interpret blueprints, research regulations, and standards and install or repair a wide variety of fixtures. Plumbers must also have strong customer service skills to explain the work required and obtain customers’ approval for the quoted price.

plumbing

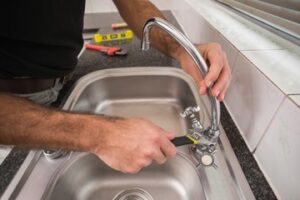
The water supply system brings freshwater into the home and distributes it to fixtures. This includes the kitchen sink, bathroom shower and bathtub, washing machine, dishwasher, ice maker and more. A plumber can help you choose the right pipes and fittings, such as PVC or PEX, for your home. Then they can install and repair them. You’ll want to keep your home plumbing system in good shape to prevent water leaks and other problems.

The main water line runs from the water company’s meter to your house. Then it branches out to your supply pipes. The main line may also have a shutoff valve before or after the meter to control your water usage. Plumbers use different tools to inspect and work on water supply pipes, including video cameras, pipe cutters, flaring pliers, dies, hydraulic pumps and specialised pipe-joining tools.

Water pipes are usually made from plastic, iron or copper. Copper pipes are popular because they’re durable and don’t change the flavor of your home’s water. However, they’re expensive and require a lot of work to install. Plastic pipes are more affordable, but they can crack or corrode over time. They’re also not as flexible as metal pipes, so they can’t bend easily or fit into tight spaces.

The water lines in your home are under pressure from the water supply system, so they’re more likely to break or burst than drain pipes. Water supply pipes are also more vulnerable to freezing temperatures, so you’ll need to take extra steps to protect them. The most important thing to do is to have a basic understanding of your home’s water supply system and the approved materials for your plumbing pipes. This will help you spot any potential issues and deal with them competently in an emergency. For example, if you notice that your home’s water pressure has dropped significantly, it could indicate that one of your water supply pipes is leaking or blocked. A plumber will be able to fix this problem quickly and effectively. They’ll be able to identify the source of the issue, whether it’s a broken pipe or a faulty water meter.

Drainage is the process of removing water and waste matter from a property. It’s important for keeping your home safe and dry, protecting your foundations, landscaping and possessions from water damage and ensuring the health of your family. Plumbers are responsible for installing and maintaining drainage systems in homes and businesses. This includes repairing damaged drains and pipes, detecting and locating blockages, and providing regular maintenance to keep your drainage system working as it should.

Plumbing is a skilled trade that requires manual dexterity and coordination, as well as analytical thinking and problem-solving skills. It’s also a physically demanding job that involves lifting heavy objects and working in awkward positions. While some plumbing jobs can be done remotely, others require the plumber to be on-site to install or repair piping and fixtures. This can make it difficult to balance a work life with a family or other commitments.

The majority of a plumber’s work is focused on residential and commercial properties, though they may also be called to work on industrial sites or government facilities. These jobs tend to be more complex than standard plumbing services and may involve specialised equipment or large-scale projects. Plumbers working on these types of projects often need to consult with engineers and other tradespeople to ensure that the plumbing is installed correctly and meets all relevant regulations.

When it comes to identifying and solving plumbing issues, plumbers use a wide range of tools and techniques. These include using specialised drain cleaning equipment, such as augers and hydro jets; testing water pressure and flow rates; locating leaks; repairing or replacing damaged pipework; and installing new fixtures and appliances, such as toilets and showers. In some cases, plumbers may need to dig up and replace entire sections of piping.

For larger plumbing installations, plumbers typically work with builders and other construction professionals to create and lay out piping systems before the concrete is poured. This prep work can help ensure that the finished plumbing system is watertight and structurally sound. It can also save time and money in the long run by avoiding costly repairs later on.

One of the most common services plumbers provide is the installation of sink garbage disposal units. These handy appliances grind food waste and flush it into the plumbing system, where it’s broken down into smaller pieces that can be easily disposed of. Kitchen sink disposal units, such as the InSinkErator models, are easy for plumbers to install. Plumbers can also install bathroom garbage disposal units, known as macerators. These toilet and sink attachments break down food waste and transfer the particles into the main drain line using fast-rotating blades.

Although a garbage disposal unit can handle most types of food waste, it is not meant to take on stringy, fibrous foods like celery, asparagus, corn husks and banana peels, which can wrap around the unit’s blade and dull it. Cooking grease, coffee grounds and eggshells can also clog a disposal. Other no-nos include starchy foods like rice, potatoes and pasta, which expand in hot water. Fats, such as butter, shortening and lard, can also jam a disposal and cause foul odors.

Another way to avoid clogs and keep your disposal in good working order is to use it sparingly. Even traces of food left on plates after eating can cause the appliance to grind and jam. It’s also a good idea to run cold water as the disposal operates, which will help to dissolve any leftover grease and clean the blades and interior of the machine.

Many people are unaware that their plumbing system also handles sewage. A plumber can help you determine if your home is in need of a septic tank or sewer system, and install the necessary components if required. A septic tank is a large, underground tank that holds wastewater and solid waste until it’s pumped out and taken to a processing plant. The tank is usually made of reinforced concrete or fiberglass, and may be lined with an impermeable membrane to prevent contamination.

Alternatively, your home may be connected to the municipal sewer system, which takes wastewater and solid waste to a processing plant. This process removes contaminants such as phosphorus and nitrogen, then disinfects the remaining water before it’s discharged back into the environment. Plumbers can install pumps and other equipment to connect homes to the city sewer system.

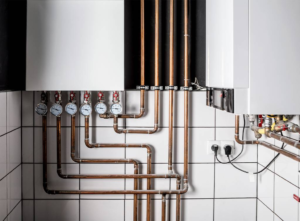
Many buildings use a hot water tank or cylinder for providing hot water. Plumbers can install, repair, and service these systems. They can also make recommendations about the best type of system for a home or business based on usage requirements and cost. For example, a plumber might recommend a pressurized hot water system for homes or commercial premises that require high levels of hot water, as these offer significant energy and space savings over time compared to traditional tanks.

Plumbers can also help prevent scalding injuries by making sure that the temperature of the hot water flowing from a shower or tap is not too high. They can do this by ensuring that the hot water pipework is properly insulated. In addition, plumbers can install recirculation pumps in hot water systems to minimise heat loss and maximise energy efficiency. They can also advise about the EPA’s WaterSense new home specification, which can help households save up to 20% in water usage.

Plumbing Services

How to Avoid Plumbing Installation Problems

Plumbing is the system of pipes and fixtures that provide a safe and reliable water supply and remove waste. Plumbers Medina is regulated by laws and codes that ensure safety and quality.

The plumbing in your home starts with large pipes that carry city water from a main line in the street to each house. Then, the pipes branch off to connect to your appliances and drains.

plumbing

Water supply lines are responsible for transporting fresh water from the main line to sinks, toilets, showers, and other plumbing fixtures. They’re essential for delivering clean, safe, and reliable water to homes and buildings. However, supply lines can be prone to issues such as low water pressure and leaks if they’re not installed correctly. To avoid these problems, follow the guidelines below when installing or repairing plumbing supply lines:

Properly sized water supply lines are critical to maximizing your plumbing system’s performance and longevity. Undersized lines restrict water flow, leading to low water pressure at your plumbing fixtures and causing excess stress on your pipes. This can result in weakened joints and leaks. By following sizing guidelines and hiring a professional to perform accurate measurements, you can ensure your supply lines are properly sized for your plumbing needs.

Different fixture types and areas may require varying supply line sizes to achieve optimal performance. This is especially true for high-demand appliances, like water heaters and washing machines. Properly sized supply lines ensure even and consistent water flow, helping your plumbing system save energy and improve performance.

Plumbing pipe comes in a variety of shapes, sizes, and materials to suit specific applications. The best choice for your project depends on a number of factors, including physical conditions, local codes, and your client’s preferences and budget. For instance, if you’re working on a residential plumbing installation or replacement job, you might prefer to use copper over PVC or PEX because it’s more durable and cost-effective. On the other hand, if you’re building a commercial plumbing project, it may be more practical to use flexible stainless steel piping because it’s easier to install and maintain.

Once you’ve chosen your plumbing pipe, it’s important to follow proper installation techniques to create a watertight seal. For example, you should always use thread tape rather than pipe dope when connecting a valve to a supply line. This is because pipe dope can melt or crack, while thread tape is designed to hold securely in place even when subjected to vibrations and temperature fluctuations.

The drain lines in your home carry wastewater and solid waste away from plumbing fixtures to the main sewer line or septic system. These lines are buried beneath your house, and they’re usually out of sight and mind until they’re clogged or damaged. Fortunately, understanding what can go wrong with your drain lines can help you prevent costly problems and keep them running smoothly.

A residential plumbing system typically has two types of drain lines: the main line and the branch line. A main drain line carries all household wastewater from toilets, bathtubs, showers, sinks and laundry appliances to the sewer line. Depending on where your home is located, the line may connect to a city sewer main or a private septic tank. A clogged main drain can lead to messy, toxic sewage backups in your home, so it’s important to recognize the warning signs and call a plumber when they appear.

During a new plumbing installation, the plumbing contractor sets all the pipes that are needed for supply and drainage systems before framing any walls or installing flooring. This includes rough-in drain fittings for bathtubs and showers, as well as sink and toilet flanges. Fixtures like toilets and showers are set to be installed last after the wall frames have been hung.

All drain lines must be sloped properly to ensure proper drainage and a tight seal. The ideal slope is 1/4 inch for every foot of pipe length. If your drain lines are not sloped correctly, they can clog frequently. This can lead to the use of harsh chemical drain cleaners or frequent calls to your local plumber for unclogging services.

All drain lines should also have a water barrier or trap in place. These are called “p-traps” and they’re typically made of PVC or ABS plastic. The water in the trap acts as a seal that keeps sewer gases and other unpleasant odors from entering your home. The maximum distance a drain line can run from a fixture to the trap is 48″. If a longer distance is used, the force of the wastewater could displace the water in the trap and allow sewer gas into your home.

Your home’s plumbing system is designed to remove water and waste efficiently. Its drainage and vent functions work together to make this happen. The drainage pipes carry waste away from your home to the city sewer line or septic tank, while the vent lines ensure fresh air gets into the drain pipes so that waste can move freely. The ventilation system is vital to preventing a buildup of water and sewer gases that could otherwise be dangerous for your family.

When a home’s vent piping becomes clogged, it can lead to slow-draining fixtures and foul odors. It can also cause gurgling sounds from drains and toilets. If you’re experiencing any of these issues, your vent piping may need to be replaced. To learn more about the function and importance of this sensitive part of your plumbing system, read on.

The vent lines in a plumbing system play an important role in keeping your drains flowing smoothly and protecting your family from hazardous fumes. When installed properly by a professional plumbing service company, the vents strike a balance between negative and positive air pressure to protect the trap seals in your plumbing drains. If negative pressure occurs, the air from the vent will enter the drainage pipe and break the siphon effect. This will prevent the p-trap from filling with wastewater and allowing sewer gas into the home.

However, if the p-trap is filled with water or the ventilation system has been installed incorrectly, it will not be possible to maintain this balance and the vents may become blocked. The best way to avoid this issue is to always hire a professional plumber for any installation or repairs to your plumbing vents.

When installing a new plumbing vent, be sure to follow local and state codes to ensure that your home is protected from future plumbing problems. Also, be sure to use the proper sized pipe for each vent so that it can easily carry waste and prevent a vacuum that could cause blockages or leaks. After installing the vent, it’s important to make sure that all of the seams are sealed and a weatherproof flashing is installed over the top to keep moisture from leaking into your home.

Whether you’re looking to upgrade your existing plumbing fixtures or install a new bathroom, kitchen, or laundry room, the right fixtures will ensure an adequate water supply and proper drainage. However, with so many options available, it can be difficult to choose the best fixtures for your needs. Before making a purchase, consider factors like energy efficiency and performance to help you select the perfect fixtures for your home.

A fixture is any device connected to a plumbing system that serves a specific purpose. Common examples include sinks, bathtubs, toilets, and showers. The pipes attached to these devices carry both water and wastewater, so it’s important that they are properly installed and inspected.

Plumbing fixtures are an essential part of any building, as they provide a means of accessing freshwater and removing waste. They’re also crucial for ensuring that buildings remain hygienic and safe. Without these systems, it would be impossible to get clean water or dispose of waste effectively.

The most common type of plumbing fixture is a sink. These are usually located in the kitchen, bathroom, or laundry room. They have a faucet that allows you to control the flow of water, and they’re also connected to a drain that carries wastewater away from the fixture.

Toilets are another important plumbing fixture, as they serve a vital function in the removal of human waste. These are typically connected to sewer or septic systems, and they use a special valve that prevents wastewater from backing up into the home’s interior.

When choosing a toilet, it’s important to consider the water efficiency and flushing capabilities of different models. It’s also important to consider any specific needs or preferences you may have, such as a low-flow model that can help reduce your water usage.

While it’s possible to paint plumbing fixtures, it’s not recommended. This is because the finish will likely wear off quickly due to constant exposure to water and moisture. Furthermore, you should only use a high-quality paint that is designed for use on plumbing fixtures.

When installing plumbing fixtures, it’s important to keep in mind that they must be CSA-approved. This is because they’re required to meet a set of standards established by the Canadian Standards Association (CSA). This includes requirements for safety, quality, and performance.

Plumbing Services

How to Repair a Faucet

Many faucet problems stem from sediment and mineral buildup, which can corrode the valve seat. In cartridge-type faucets, loose or damaged O-rings and a worn inlet or outlet seal can also cause leaks.

faucet repair

First, shut off the water. Next, remove the decorative cap from each handle using a flathead screwdriver. Once the screw is removed, place the parts in order they were removed so you can easily reassemble them. For professional help, contact Local Law 152.

Leaks are often the result of a damaged component. Rubber washers, o-rings, and gaskets are inexpensive and relatively simple to replace. Cartridges and valve seats may require a bit more effort, but they are also affordable options for restoring a faucet. Disc cartridges are harder to diagnose and replace, but once you’ve removed the old one you can often take it with you to the home improvement store for a replacement.

Faucets are subject to many different kinds of damage over time. This is mostly due to wear and tear, but sometimes the cause is more dramatic. Unusually high or low water pressure can cause the internal parts of a faucet to wear out faster than normal, causing leaks and other problems. A faucet can also be damaged by misuse or abuse, including rough handling, over-tightening of handles, and water pressure too high for the fixture.

The best way to address these problems is to start by making sure the shutoff valves beneath the sink are fully open. Then remove the handle using a screwdriver and examine the interior components for signs of wear and tear or damage. Once the handle is removed you should be able to see a cam-nut or adjustable ring (also known as a ring cap) underneath the faucet that holds the stem or cartridge in place. If the nut is loose or missing altogether, tighten it with needle-nosed pliers. If there’s a problem with the cartridge or stem, unscrew the cam-nut or adjuster ring and unscrew the plastic cam and packer to remove the cartridge and see what needs to be replaced.

If you’re replacing a cartridge, take the old one with you to the hardware store to ensure you get the right replacement. It’s also a good idea to replace the O-ring that is usually found under the cartridge, since it can easily wear out too. Make sure you coat the new O-ring with plumbers grease to prevent it from leaking or burning up on contact with hot water.

If a new seal doesn’t fix the leak, you can try tightening the valve seat with a wrench or o-ring spanner to see if that fixes it. If the faucet is corroded beyond repair or you’re looking to upgrade its features, consider replacing it entirely. A new faucet that’s more efficient will save you money and will last longer than the original, even with constant use.

Leaks

The first step in faucet repair is to locate the leak. Look for water leaking from around the base of the handle or where the handles connect to the stem. In some cases, a loose screw or worn O-ring may be the cause of the leak. Simply tightening the screw or replacing the O-ring should stop the leaking.

Another common cause of leaking is a dirty valve seat. Over time, minerals in the tap water build up and deposit on the valve seat, causing a leak. Pouring white vinegar over the valve seat and then scrubbing it should help clean it. If a DIYer is unable to fix the problem, it’s best to call in a plumber.

If the faucet leaks at certain times of day or when specific tasks are undertaken, it could be due to changes in water pressure. In this case, the excess pressure is preventing water from flowing away properly and it backs up into faucets and other parts of the house. An experienced plumber can test the water pressure and determine if it’s too high.

Once a homeowner has replaced the damaged parts and cleaned the rest of the sink, they’re ready to reassemble their faucet. It’s important that the replacement parts are an exact match to prevent a new leak from occurring in the future. The order of assembly is washer/O-ring, stem, packing nut, screw and handle. Once reassembled, it’s essential to turn the water supply back on and check for any additional leaks.

When a dripping faucet can send up to three gallons of water down the drain every day, it’s not something that should be ignored. If a DIYer is unable or unwilling to solve the issue, it’s best to call in seasoned professional plumber to do so. The Frontdoor app makes finding the right Pro fast and easy, with real-time chat for advice on home repairs or maintenance and a list of vetted local experts who can make the fixes. Get started with a free quote. Just download the app, snap a picture of your faucet and enter some basic information to receive custom estimates from nearby Pros.

Cartridge Replacement

One of the most common problems in cartridge faucets is worn-out cartridges and O-rings. These parts can become corroded or coated with hard water mineral deposits, which can lead to leaking and difficult turning of the handle(s). Replacing these parts usually fixes these issues. To replace a cartridge, first shut off the water to the faucet by turning the valve(s) clockwise. Then, remove the handle(s). This might require the use of a hex wrench, which may be included in a faucet repair kit. Once the handle is removed, you can see and reach the cartridge retaining nut. If you do not have a hex wrench, use channel-type pliers to turn the retaining nut counterclockwise until it is loose and removed. After removing the retaining nut, carefully pull the cartridge straight up to remove it from the faucet body.

Some faucets have a clip that holds the cartridge in place. If yours does, use a flat-blade screwdriver to pry the clip away from its retention slot. This will reveal two plastic tabs on the cartridge that must be precisely aligned with the corresponding notches or slots in the new cartridge to ensure a tight fit. The white plastic tool that comes with most faucet kits has a square top that will fit neatly over the cartridge stem to help you grasp it and pull it out.

Once you’ve loosened the cartridge and removed it, take the new replacement and install it in the faucet by slipping it into its slot(s). Make sure the notches in the cartridge match the corresponding notches on the sleeve. If the sleeve does not fit tightly, it will leak. If you installed the cartridge correctly, it should click into place and be snug.

Once the new cartridge is in, put the retaining nut back on and reattach the handle(s). Replace the decorative collar (if present) and screw the handle(s) on. Open the water valve(s) and test the faucet for proper operation. If any other parts need replacing, do so now. They don’t make faucets like they used to, but replacement parts are available for most brands and styles at hardware stores, home centers and plumbing supply centers. If you’re unsure what type of faucet you have, it is best to shut off the water and disassemble the fixture before buying replacement parts. This will assure a perfect fit and help you avoid expensive mistakes.

Handle Replacement

Replacing the faucet handle is an inexpensive, straightforward way to update the look of a bathroom. It also can be a troubleshooting step when a cartridge has been replaced and the handle is still leaking or difficult to turn.

Before attempting to replace the handle, turn off the water supply valves beneath the sink. Look under the sink for these valves, which typically are located on either side of the faucet cartridge, and close them by turning the knobs clockwise to shut off the water flow. This will help prevent scalding injuries and ensure that any work you do will not affect the water in your home.

Shut off the water supply at the house shutoff valves, too, if your faucet is a single-handle model that doesn’t have separate shut-offs for each hot and cold. Whether you’re working on a double- or single-handled faucet, it’s essential to shut off the water so that you don’t accidentally damage any components while trying to fix the leaky one.

Examine the faucet handle to determine how it is secured to the cartridge and faucet baseplate. Many lever handles have a set screw under the curve of the handle; others have a decorative cap on the top of the handle that you must remove to access the handle setscrew. Use a flathead or Phillips-head screwdriver to remove the cap and reveal the handle setscrew underneath.

Once you’ve removed the handle, pry off the cover plate and unscrew the retaining screw at the base of the handle with an Allen wrench. You may want to label the retaining screw with a small piece of tape, such as “cartridge” or “handle,” so that you don’t lose it while installing the new handle.

Remove the handle securing screw and the handle from the faucet, then slip the replacement onto the handle and secure it with the retaining screw. Replace the handle cover plate and screw the handle back into place, ensuring that it snaps into place.

Replace the cartridge, if necessary. Make sure the new cartridge is the same type as the old one, and that it fits the cartridge holder’s hole. You may have to loosen the nut on the end of the stem in order to insert the new one, so have a set of needle-nose pliers handy to keep from scratching the spout and valve assembly with the tip of your pliers.